
So, you’re a cat lover and have always been fascinated by the beauty of Persian cats. Their luxurious coats and unique facial structure make them an absolute delight to admire. But have you ever wished you could capture their elegance on paper? Well, you’re in luck! In this article, we will guide you through the process of drawing a Persian cat in easy steps. Whether you’re an aspiring artist or just looking for a fun way to express your love for these feline friends, grab a pencil and let’s get started on this artistic journey together!
Materials needed
To start drawing a Persian cat, you will need a few basic materials. Make sure you have the following supplies ready before you begin:
Pencil
A good quality pencil is essential for a clean and precise drawing. Choose a pencil with a medium hardness, such as an HB or 2B, as it will allow you to add both light and dark lines.
Eraser
An eraser is a handy tool for correcting any mistakes or smudges. Make sure you have a soft and clean eraser that won’t damage your paper.
Paper
Select a smooth and sturdy paper suitable for drawing. A heavier weight paper, like bristol or drawing paper, will prevent your drawing from getting wrinkled or torn as you work.
Ruler
A ruler will help you create straight and accurate lines. Look for a transparent ruler to easily measure and guide your pencil strokes.
Colored pencils or markers
If you wish to add color to your Persian cat drawing, you can use colored pencils or markers. These will bring your artwork to life and allow you to get creative with your color choices.
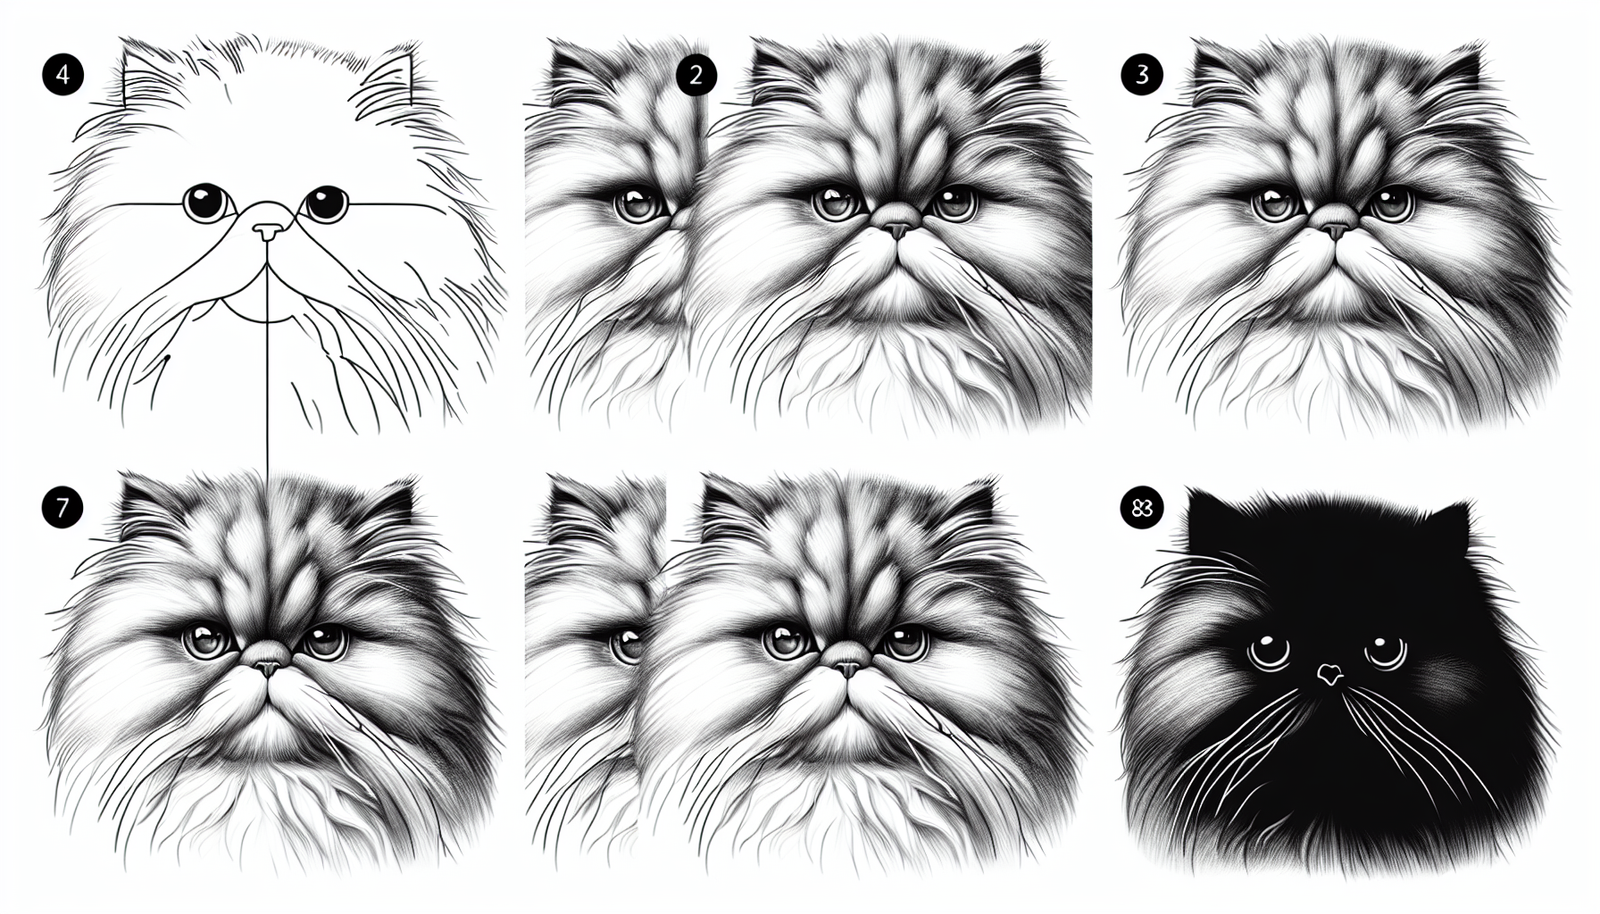
Step 1: Basic outline
Start by drawing a circle to represent the head of the Persian cat. This circle will serve as the foundation for the rest of the drawing.
Next, add a curved line that flows from the top of the head to the back, creating the cat’s neck and back.
Sketch a small oval shape beneath the head to form the body of the cat.
Lastly, draw the legs and paws. Keep in mind that Persian cats have fluffy fur, so add a bit of volume to the legs.

Step 2: Refining the head
Now it’s time to add more details to the head of your Persian cat. Start by drawing the ears on top of the head. Persian cats have rounded ears with some fur tufts, so make sure to capture that in your drawing.
Move on to the face and begin adding the eyes, nose, and mouth. Persian cats have rather large and expressive eyes, so try to capture that in your drawing. Pay attention to the placement and size of these features.
Lastly, include the fur around the face. Persian cats have a lot of fur around their cheeks, so make sure to show that in your drawing. Add soft, curved lines to represent the fur.
Step 3: Drawing the body
Refine the shape of the body by adding more curves and volume. Persian cats have a rounded body, so try to capture that in your drawing.
Next, draw the tail flowing towards the back of the cat. Persian cats have long and fluffy tails, so make sure to add some volume and texture.
Sketch the front and hind legs in more detail. Pay attention to the proportions and anatomy of the legs, and add small details like toes and paw pads.

Step 4: Adding fur and textures
Persian cats are known for their long and fluffy fur, so it’s important to capture that in your drawing. Start by drawing the long, fluffy fur on the head. Use long and curved lines to represent the fur, and take your time to create a sense of volume and texture.
Continue adding fur details on the body. Pay attention to the direction the fur is flowing and add short, curved lines to represent the fur strands.
Don’t forget to include the whiskers and eyebrows! Persian cats have long and prominent whiskers, so make sure to add them near the nose. Add short and curved lines to represent the whiskers, and make them stand out from the rest of the fur. For the eyebrows, draw small and thin curved lines above the eyes.
Step 5: Facial features
To make your Persian cat drawing even more realistic and expressive, it’s important to refine the facial features. Start by focusing on the eyes. Persian cats are known for their large and expressive eyes, so take your time to capture that. Use shading and small details to add depth and realism to the eyes. Experiment with different shades of pencil to bring out the details.
Next, add shading to the nose and mouth. Persian cats have a rounded nose and a small mouth, so make sure to capture those characteristics in your drawing. Use light shading to create depth and dimension.
Pay attention to the details of the ears as well. Persian cat ears are rounded and have fur tufts, so make sure to add those elements to your drawing. Use short and curved lines to represent the fur on the ears.
Step 6: Final touches
As you near the end of your drawing, take a step back and assess your work. Are there any unnecessary lines that can be erased? Use your eraser to clean up any stray marks or lines that don’t contribute to the overall look of your drawing.
To add depth and dimension to your drawing, consider adding shadows and highlights. Observe your reference image or real Persian cats to see where the light is hitting the cat and create shadows accordingly. Use darker shades of pencil to add shadows and lighter shades to add highlights.
Now it’s time to bring your Persian cat drawing to life by adding color! If you have colored pencils or markers, use them to add color to your drawing. Pay attention to the colors of the fur, eyes, and any other details you wish to highlight.
Tips and tricks
Drawing a Persian cat may seem challenging, but with a few tips and tricks, you can make the process easier and more enjoyable:
- Start with light pencil strokes for easy erasing. This way, if you make any mistakes, you can easily correct them without leaving any visible marks.
- Take breaks to assess your progress. Stepping away from your drawing for a few minutes can help you see it with fresh eyes and identify any areas that need improvement.
- Refer to reference images or real Persian cats for inspiration. Observing real cats or looking at photographs can help you understand the anatomy and details of a Persian cat, making your drawing more accurate and realistic.
Common Mistakes to Avoid
While drawing a Persian cat, it’s important to be mindful of some common mistakes that beginners often make. By avoiding these mistakes, you can create a more accurate and realistic drawing:
- Drawing the head too small or too big. Pay close attention to the proportions of the head in relation to the body. Persian cats have a relatively large head compared to their body size, so make sure to capture that in your drawing.
- Neglecting to add fur texture and details. Persian cats have long and fluffy fur, so it’s important to add texture and volume to your drawing. Take your time to observe reference images or real cats to understand how the fur flows and then incorporate that into your drawing.
- Skipping the necessary proportions and anatomy. Pay attention to the proportions of the body, legs, and facial features. Persian cats have distinct characteristics, so make sure to accurately represent them in your drawing.
Conclusion
Drawing a Persian cat may seem challenging at first, but with practice and following the step-by-step instructions, you can create a beautiful representation of this elegant breed. Remember to be patient and have fun while honing your drawing skills! As you continue to practice, you will develop your own unique style and techniques for capturing the beauty of Persian cats on paper. So grab your pencils and start sketching these adorable felines!