
If you’ve ever wanted to learn how to draw a tabby cat but found it intimidating, fear not! In this article, you’ll find a step-by-step guide on how to draw a tabby cat easily, even if you’re a beginner. With simple instructions and helpful tips, you’ll be able to create an adorable feline masterpiece in no time. So grab your pencil and paper, and let’s get started on this artistic adventure!

Choosing the Right Materials
Gathering Your Art Supplies
Before you start drawing your tabby cat, it’s important to gather all the necessary art supplies. Make sure you have a good quality sketchbook or drawing paper, as well as a range of graphite pencils or charcoal for sketching. Additionally, you may want to have colored pencils or markers on hand if you plan to add color to your drawing. Don’t forget to have a good eraser to correct any mistakes, and some blending tools like tissue or blending stumps to create smooth transitions.
Selecting the Right Paper
Choosing the appropriate paper for your tabby cat drawing is crucial. Opt for a paper with a smooth surface that allows you to achieve precise details and smooth shading. If you’re working with graphite or charcoal, a heavyweight drawing paper is recommended to prevent smudging and ensure your artwork lasts. If you plan to use colored pencils or markers, make sure the paper is designed for that medium to prevent bleeding or feathering.
Choosing the Best Drawing Tools
When it comes to drawing a tabby cat, having the right tools can make a significant difference in the outcome. Graphite pencils of varying hardnesses allow you to achieve different shades and textures. If you prefer more versatility, charcoal pencils can create bold, dark lines and easily blend for smooth shading. Colored pencils come in a wide range of hues and allow for precise coloring and layering. Experiment with different drawing tools to find the ones that suit your style and desired effect.
Observing the Tabby Cat’s Features
Studying Reference Photos
To capture the unique features of a tabby cat, it’s essential to study reference photos. Look for high-quality photos that showcase different angles, lighting conditions, and fur patterns. Take note of the cat’s body proportions, facial expressions, and the specific details of its fur. Observing these reference photos will help you understand the tabby cat’s distinctive characteristics and ensure a more accurate representation in your drawing.
Noting the Tabby Cat’s Body Proportions
Understanding the proportions of a tabby cat is crucial in creating a realistic drawing. Start by observing the overall size and shape of the body, as well as the positioning of the limbs. Take note of the head-to-body ratio and how the cat’s tail flows and balances the composition. Pay attention to details such as the size and positioning of the ears and eyes. By carefully noting these body proportions, you’ll be able to accurately depict the unique form of a tabby cat.
Analyzing the Fur Patterns
Tabby cats are known for their beautiful and intricate fur patterns. Examine reference photos to identify the patterns present on the cat’s fur, such as stripes, spots, or swirls. Take note of the direction and thickness of the fur strands, as well as any unique markings or color variations. Understanding how the fur patterns flow and interact with the cat’s body will allow you to incorporate these details into your drawing and bring the tabby cat to life.
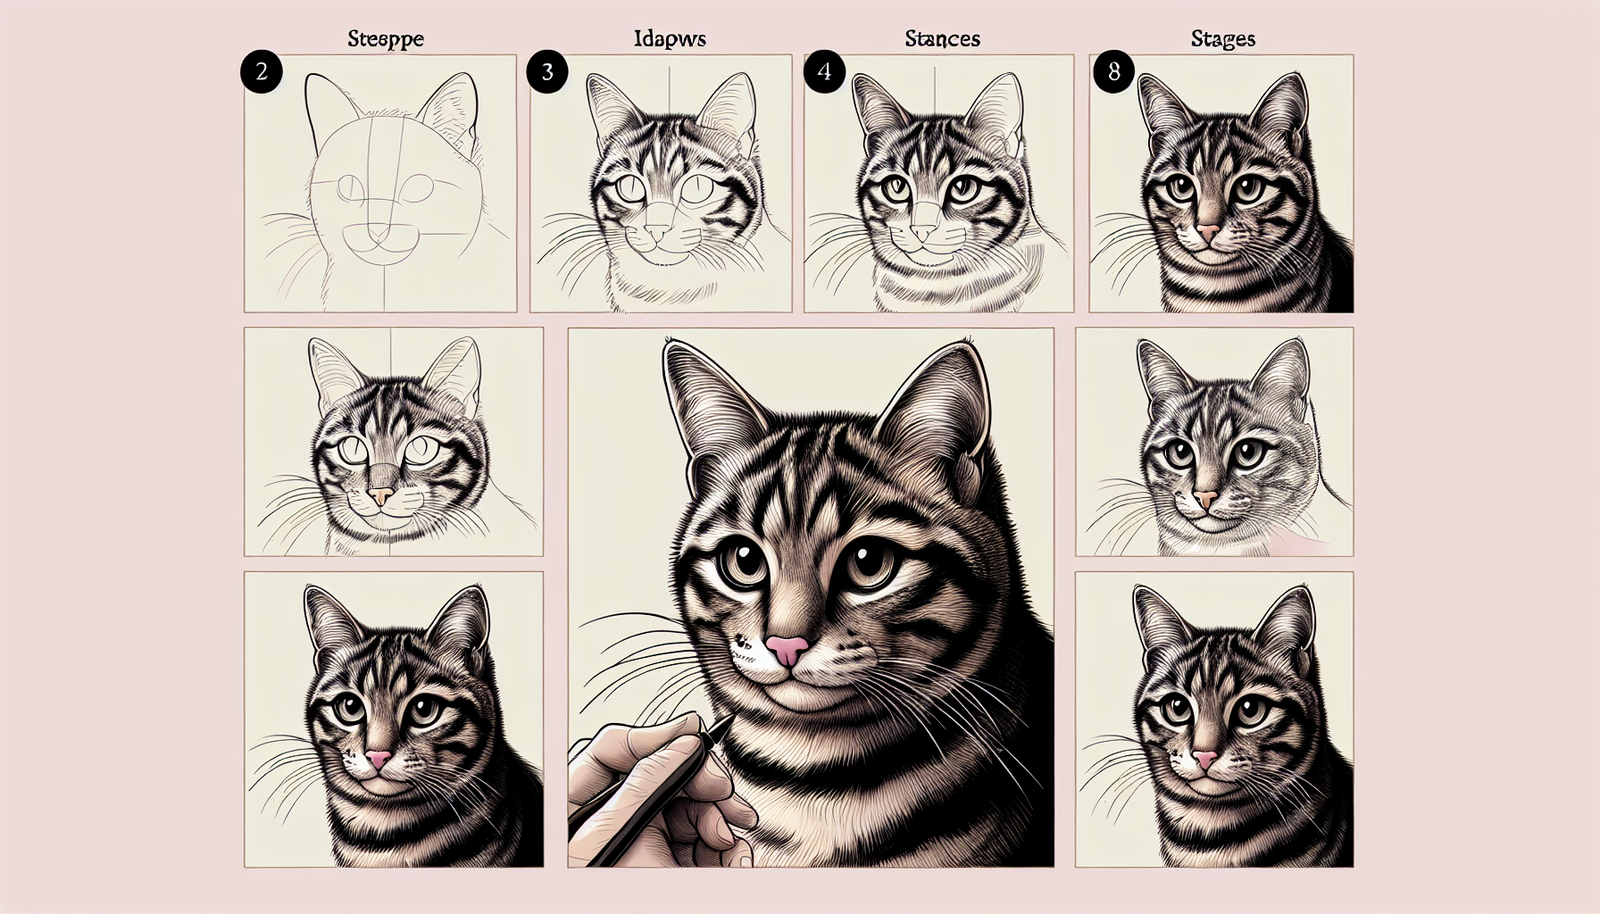
Sketching the Basic Shapes
Drawing the Outline of the Cat’s Head
Begin by sketching the basic shapes that form the foundation of your tabby cat drawing. Start with a rough outline of the cat’s head, using simple shapes like circles and ovals. Pay attention to the reference photos to accurately capture the shape and proportions of the head, as well as the positioning of the ears and facial features. Don’t worry about adding detail at this stage; focus on getting the basic shape right.
Adding the Body and Limbs
Once you’ve sketched the head, proceed to add the body and limbs. Use simple geometric shapes to outline the body, such as rectangles or ovals for the torso and cylinders for the legs. Pay attention to the cat’s pose and position in the reference photo to accurately depict the body proportions and the bend of the limbs. Connect the head to the body by adding a curved neck, and make adjustments as needed to ensure a balanced and proportionate drawing.
Defining the Facial Features
Next, it’s time to add more detail to the cat’s face. Start by sketching the placement of the eyes, using reference points like the width of the head and the position of the ears. Then, carefully outline the shape of the eyes and add the pupils and irises. Don’t forget to draw the nose, using simple shapes like triangles or circles, and include the whiskers. Finally, add the mouth and any other defining facial features. Remember, it’s okay to make adjustments and refine the shapes until you’re satisfied with the overall appearance.
Drawing the Details
Adding the Ears and Eyes
Now it’s time to add more detail to the cat’s ears and eyes. Pay close attention to the reference photos to accurately capture the shape and position of the ears. Use light, confident strokes to define the contours and add any inner details. When drawing the eyes, focus on capturing the shape, depth, and expression. Pay attention to details like the reflection in the eyes or the eyelashes to make your drawing more realistic and engaging.
Creating the Nose and Whiskers
The cat’s nose is an essential feature that adds character to your drawing. Carefully observe the shape, nostrils, and any unique details, such as bumps or shading. Use light and subtle strokes to create a realistic representation. When it comes to adding the whiskers, remember they should be placed evenly on each side of the cat’s face and extend outward from the nose. Use precise lines to suggest the delicate whiskers and add a touch of whimsy to your drawing.
Sketching the Mouth and Tongue
Drawing the cat’s mouth and tongue adds another layer of detail to your artwork. Observe the reference photo to capture the shape, position, and curvature of the mouth. Pay attention to any distinguishing features, such as a dropped jaw or visible teeth. When adding the tongue, remember it should complement the overall composition and give a sense of movement or playfulness. Use light, flowing lines to depict the softness and texture of the tongue.

Shading and Texturing the Fur
Understanding the Light Source
Before you start shading, it’s important to understand the direction and intensity of the light source in your reference photo. This will help you determine where the highlights and shadows should be placed on the cat’s fur. Take note of the light’s angle and adjust your drawing accordingly to ensure a realistic portrayal.
Applying Light and Dark Areas
To create dimension and depth in your tabby cat drawing, it’s crucial to master shading techniques. Begin by identifying the areas of the cat’s fur that are in shadow and those that are highlighted by the light source. Use a range of shading techniques, such as hatching and cross-hatching, to gradually build up the values and textures. Focus on blending the transitions between light and dark areas to achieve a smooth and realistic appearance.
Adding Texture with Pencil Strokes
To bring the tabby cat’s fur to life, pay attention to the texture of the fur strands. Avoid using uniform lines or strokes; instead, vary the pressure, direction, and spacing of your pencil strokes. Use short, quick strokes to create the appearance of fur and add depth. Experiment with different pencil grades and practice blending techniques to achieve the desired texture and realism.
Emphasizing the Tabby Cat’s Stripes
Drawing Bold Outline for the Stripes
One of the defining features of a tabby cat is its stripes. Start by observing the reference photo and using light, sketchy lines to outline where the stripes will be positioned. Begin with the broader, more prominent stripes and adjust their thickness and placement to match the reference photo. Gradually darken and smooth out the lines to create the bold and expressive stripes that give the tabby cat its character.
Adding Shadows and Highlights
To make the stripes appear three-dimensional, use shading techniques to add shadows and highlights. Observe the reference photo to determine where the shadows fall along the stripes and use a darker pencil or charcoal to add depth. Conversely, use a lighter pencil or blending tool to create highlights on the areas of the stripes that catch the light. This contrast will enhance the realism of your drawing and make the stripes pop.
Blending Colors for Realistic Effect
If you’re adding color to your tabby cat drawing, blending is key to achieving a realistic effect. Begin by selecting a color palette that matches the reference photo and layer the colors gradually, starting with lighter tones and building up to darker hues. Use blending tools, such as a blending stump or soft brush, to blend the colors together smoothly. Take your time and remember to refer back to the reference photo to ensure accuracy and natural-looking colors.
Adding the Finishing Touches
Refining the Facial Features
Now that most of the drawing is complete, take the time to refine the facial features. Pay close attention to small details like the shape of the eyes, the whiskers, and the mouth. Erase any unnecessary guidelines or overlapping lines and make any necessary adjustments to ensure all the features are in harmony. This stage of the drawing process adds a polished touch to your tabby cat, showcasing your attention to detail.
Enhancing the Fur with Details
To elevate your tabby cat drawing, consider adding additional details to the fur. This could include adding stray hairs or small tufts of fur to create a sense of realism and texture. Refer back to the reference photo to identify areas where these details will enhance the overall composition. Use light, delicate strokes or even a white gel pen to add these final touches and bring your tabby cat’s fur to life.
Erasing Unwanted Guidelines
As you near the completion of your drawing, take a moment to review your artwork and identify any remaining guidelines or stray marks. Carefully erase these unwanted lines to ensure a clean and polished final result. Be mindful not to erase any necessary details or shading, and use a gentle touch to avoid damaging the paper. This step will give your drawing a professional finish and make it ready for coloring or framing.
Coloring the Tabby Cat
Choosing a Color Scheme
If you wish to add color to your tabby cat drawing, choosing the right color scheme is essential. Look at your reference photo and identify the primary colors present in the cat’s fur and surroundings. Determine if the colors should be warm or cool, vibrant or muted, and choose a harmonious color palette that complements the overall composition. Take into consideration the lighting conditions and the atmosphere you want to convey through color.
Layering the Colors
When coloring your tabby cat, start by laying down a base layer of color using light pressure. Gradually build up the layers, using medium and then heavier pressure, to achieve depth and richness. Utilize blending techniques to smooth out color transitions and avoid harsh lines. Continue to refer to your reference photo to ensure accurate color placement and to capture the unique variations in the tabby cat’s coat.
Blending and Adding Gradient Effect
To create a realistic and blended appearance, focus on blending the colors together seamlessly. Use techniques such as layering one color over another, creating gradients by transitioning from light to dark, and subtle blending with a blending stump or soft brush. Take your time and work in layers to gradually build up the colors, paying attention to the direction and texture of the fur patterns. This will bring your tabby cat to life and give your artwork a polished and professional finish.
Creating a Background
Deciding on a Background Style
To complement your tabby cat drawing, consider adding a background. The choice of background style depends on the mood and narrative you want to convey. You can go for a simple background, such as a solid color or a soft gradient, to keep the focus solely on the cat. Alternatively, you might want to create a more detailed background that includes elements such as a park, a cozy home, or a natural setting. Choose a background style that complements the character and adds depth to your artwork.
Adding Depth and Dimension
To create depth within your background, employ various techniques such as atmospheric perspective, which involves making distant objects lighter and less detailed than those in the foreground. Additionally, use shading and shadows to give your background elements a three-dimensional feel. Consider how the lighting and shadows from the tabby cat will interact with the background, as this will enhance the overall believability and cohesion of your artwork.
Incorporating Other Elements
Adding other elements to your background can further enhance the story or context of your tabby cat drawing. Consider including objects like toys, plants, or other animals to create a narrative or capture the cat’s environment. These additional elements can also serve as compositional aids, helping to frame and balance the main subject. Experiment with different objects and arrangements to find the composition that best complements your tabby cat.
Practice and Experiment
Practicing Basic Shapes and Proportions
Improving your drawing skills requires practice and experimentation. Dedicate time to sketching basic shapes and proportions, even without a reference. This exercise will train your hand-eye coordination and help you become more comfortable with capturing the form of a tabby cat. Start with simple shapes like circles, squares, and rectangles, and gradually progress to more complex shapes.
Experimenting with Different Art Techniques
Don’t be afraid to experiment with different art techniques to discover your own unique style. Try different shading techniques, such as stippling or cross-hatching, to add texture to your drawings. Explore different materials, such as colored pencils or markers, to see which medium suits your preferences. Embrace the freedom to make mistakes and learn from them, as this will ultimately contribute to your growth as an artist.
Seeking Feedback and Improving Skills
One of the best ways to improve your drawing skills is by seeking feedback from others. Share your tabby cat drawings with friends, family, or a supportive online community. Be open to constructive criticism and suggestions for improvement. Pay attention to areas that people highlight for improvement and work on those aspects in your future drawings. Remember, constant practice, experimentation, and feedback are the keys to becoming an even better artist.